The Making of the Tile Mural
Since Marcus' bathroom in his old house was too small for a conventional wall mural, and he was planning on tiling anyway, I thought of using some of the tile paints I'd seen on TV to paint him a small-scale tile mural to go over the bathtub. Of course, searching for the paints ended up being an ordeal, and I ended up only finding 6 pots of paint in the colors I needed! We did a test tile first, since we had been warned by a tile expert (hah!) that all the paints he'd ever tried just end up chipping or rubbing off. The test tile held up to all the scrubbing and cleaning products we could give it except for the steel wool test...and who is ever going to use steel wool to clean their bathroom tiles?
If you have any questions or would like to let me know what you think of my work, please send me a note...
I found this flyer at an art supply store before I left the States for my stay in England in 1997, so I brought it with me to see if I could find it over there. After getting my mom to investigate how much it was to purchase and mail over to the UK, since I hadn't had any luck finding it so far, we found out it was from France, so I should have definitely been able to get it over there! After a few long-distance phonecalls, I did find a store which carried them, but they didn't have much selection. I got lucky they barely had the colors I needed...
They didn't have a corporate website when I looked in 1997, but now I've found out they do...
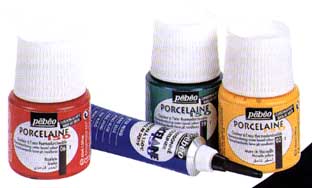
These are what the actual pots of paint look like. This is taken from the four-page handout given with the paints. There are hints, suggestions and instructions for using the paints of different kinds of surfaces. Basically, if the item will survive 150 to 160 degrees Celsius, like metal, terracotta pots, etcetera, you can paint on it with these paints.
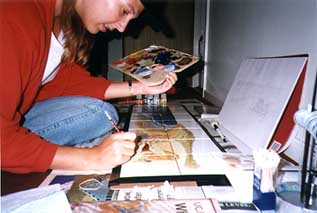
This is me finishing up the detail work on the shells in the mural. I set up the tiles with their spacers and taped them down on two pieces of cardboard so they wouldn't move as I was painting. I wanted to make sure the spacing would remain the same and strange diagonals or curves would remain in line over the different tiles. Also, you can barely see my original sketch on my pad leaning against the wall in front of me. I drew the main design on the tiles in pencil first, but the pencil didn't really want to draw on the tile, so I had to be careful not to rub it off...
This animation is made up of four pictures, including the final image and three I took as I waited for the paint to dry between layers.
What was difficult about this tile paint was that all the colors I had, except for the white, were transparent, so that meant that I had to work with overlapping colors. If you've ever done any painting, most pigments are all opaque, so you don't really need to worry about an underlying color showing through. This product, Porcelaine 150, a special ceramic water-based paint from France that can be cured in a kitchen oven, requires you to switch your mindset and plan carefully so that your underlying colors contribute to your final colors. The other tricky part is that you can only brush on the color once, or on the next brush stroke, the brush starts picking up the paint off the slick tile surface, so patience (something I've never really been good at!) is a must! This transparency has its uses, though, since it makes shadows much easier, since you can just use one shading color and paint over the underlying colors. Also, to get the deep rich teal blue of the ocean, I used about 15 separate layers of color by the time I was finished...
This three-and-a-half by one-foot tile mural was installed in Marcus' old house's bathroom in Didcot, Great Britain, but he has since moved to a new house. I wonder what the new owners thought of my mural? Did they leave it to enjoy for themselves, or did they tear out all my hard work?...