"Britta, Amazon Goddess"
(Halloween 2000)
I had originally planned finally to be a Valkyrie for Halloween 2000 because I had actually found a plastic torso form to use as a mold for a breastplate, but then my friend announced she was planning on being a Valkyrie, so I needed a different costume. In April, I had received the nickname "Amazon Goddess" from co-workers, so I decided to run with that concept and figure out what I wanted an Amazon Goddess to look like...toga? Romanesque with armor? Prehistoric with animal skins? Obviously, I ended up closer to "Xena, Warrior Princess" than anything else because I liked the militaristic tones without having too much armor, but I just took Xena's outfit as inspiration and created my own design, including lighter brown leather to go with my lighter-colored hair, etc.
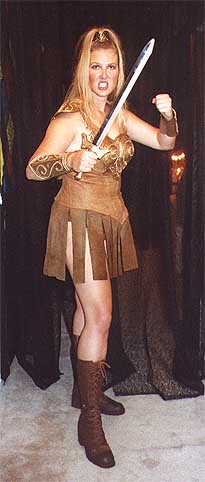
Hair:
Yes, that is my own hair, fixed in a ponytail on the top of my head with a napkin ring decorating the ponytail. This napkin ring was the source of inspiration for the curlycues used throughout the decoration of the armor.
Sword:
Since I originally thought I was so clever in finding a nice long, fairly straight redwood branch when I was up in the coastal mountains, but then using that as a spear did not look as good as I had planned, I purchased a costume sword. Since it was much too shiny gold on the hilt, and too ornate, I used some of the leather, covered the grip of the handle, then used raw umber acrylic paint to antique the gold. I left the blade shiny, since any good warrior knows enough to keep good care of her blade!
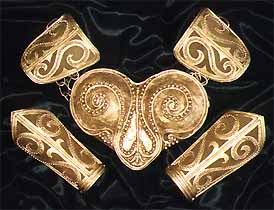
Breastplate:
I coated the area of the plastic torso I was going to use with petroleum jelly, then used Celluclay instant papier-mache. This stuff is great! It comes as a fine paper powder that is already infused with glue, so all you do is mix it with the correct amount of warm water, knead it to mix it well, then you have papier-mache clay that you can leave as thick as you want! This makes for a very sturdy breastplate for normal wear, but obviously not for any real battles. Since when making a sturdy layer, the Celluclay is so thick, make sure you make your holes and trim your edges while it is still wet, otherwise you'll need a power drill to make any holes and will risk breaking the rest of the shape if you wait until afterwards. Unfortunately, I learned this lesson the hard way while making this breastplate, so I spent long hours chiseling the edge away as well as finding epoxy glue to use since I had no power drill to make any holes for any straps.
After waiting about a week for this thick layer to dry, it was still moist where it was in direct contact with the plastic torso, so since it was stable enough to keep its shape, I took it off the torso mold and placed it in the oven at the lowest temperature ("warm" on my oven) so it would dry slowly and thoroughly.
Once it was completely dry and cool, I hot-glued finely-woven nylon cording (clothesline from Home Depot) and plastic pearls by the yard onto the main base according to the curlycue design I had planned. At this point, none of the colors matter, so I used whatever I found that will give me a good shape.
Once all the decoration was in place, I coated the breastplate with Activa Li-Qua-Che liquid papier-mache, which brushes on just like paint, stirring well always to keep it from settling to the bottom. I used a couple coats for good coverage. Since this liquid papier-mache is white, it works as a primer coat over all the various colors, so now it was ready for gilding.
I found leafing paint at a craft store, but this does require paint thinner/mineral spirits for cleanup, so make sure you are prepared or you can ruin a good brush very easily, along with gold hands for quite awhile, too! Since I look best in gold anyway, I was keeping the whole outfit in gold and brown leather, so I only used gold leafing paint. After the leafing paint is completely dry, it needs a water-based sealer otherwise it remains slightly tacky and could rub off on other surfaces. Since I did not want any shine since I wanted armor that looked used in battle, I used matte-finish ModgePodge to seal, then after that was dry, I used raw umber acrylic paint to antique the breastplate.
Wearing it was more of an issue because my plan for holes to attach a leather strap was no longer possible, so I used an epoxy-type glue to fix beltloops to the sides, then ran a thin leather strap through both and around the back. Lamp chain attached to the chest strap in front and back was used for the shoulder straps which also held on the shoulder plates.
Shoulder Plates and Forearm Greaves:
Since I had already made the breastplate out of the Celluclay and realized there was no way to cut out shapes from that after it was dry, I used normal papier-mache from newspaper strips to make the shoulder plates and forearm greaves. The forearm greaves were formed over a couple of flexible foam packing pieces that had surrounded a rod, and I was able to move them into the correct shape to fit my forearms. The shoulder plates were formed over the sides of plastic 32 oz cottage cheese containers. After the layers were just thick enough to hold their shape, I cut out the curlycue patterns, then hot-glued on more pearls by the yard and nylon cording, covered all with the liquid papier-mache and painted it all with the gold leafing paint. These gold filigree-looking pieces were then hot-glued to matching brown leather. The greaves were leather sewn together in a tube with a notch at the wrist so they would go over my hands but still stay tightly on my forearms. The shoulder plates had the leather reinforced underneath with the same black stiff iron-on interfacing as the skirt flaps.
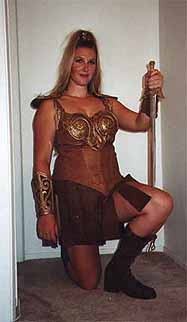
Bodice and Skirt:
I sewed the entire bodice, skirt and matching leather panties out of two leather jackets I bought at a thriftstore. I had already sewn a similar bodice for the Cyndi Lauper red dress, so I modified that pattern extending it longer to the hips for the flap skirt, then using purchased underwires and plastic boning for strategic bracing. I had originally planned for a double layer of skirt flaps, but I did not have enough leather, hence the matching leather panties underneath instead for coverage. Even though this leather was thin, wearable grade, I still broke two or three sewing machine needles!
Boots:
The boots are vintage 1970s platform lace-up boots that were completely covered with raw umber acrylic paint specifically for use with this costume, then relaced with leather cord. You can see the boots in their original orange-rust fake leather look with flesh-colored plastic heels and black laces glory in my 1970s disco party costume.
Copyright ©1996-2008 Britta Blvd. All rights reserved. All text, photos, graphics, artwork and other original material on Britta Blvd
are copyrighted and may not be published, broadcast, rewritten or redistributed without prior written consent.