Head:
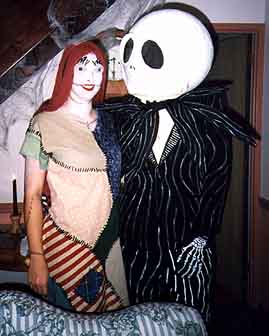
We found a large inflatable rubber ball at Toys'R'Us that was large enough in scale with Marcus' actual height. I coated the ball with petroleum jelly, then used papier-mache with newspaper strips & watered down white glue (Elmer's glue) in just enough layers to be solid, leaving the neckhole open at the bottom. This took me several days, since I would do one layer, then let it dry completely overnight before starting the next layer. Once it was solid enough, I deflated the ball, leaving just the papier-mache shell. I then drew out the placement of the eyes, nose and mouth, using the first image from the video of Jack after he sheds his pumpkinhead as the model with the curvy, crooked grin. I used small rolls of newspaper taped on for the shaping of the grin and the eyebrows. I used the pieces from the holes I cut for the eyesockets for the nose bridge. Then I papier-mached over those shapes so it all blended in as the face. About two coats of white primer paint covered the newsprint just fine. I drew on the "teeth" and mouth with a black permanent marker.
As for inside the head, you need to do something to hold up the head at the level so you still have a neck and you can see out the eyeholes. I had thought of rigging a headband with wires coming up into the inside top of the head, but we ran out of time, so we just used a folded up towel sitting on top of Marcus' head. Since the eyeholes are so large, I covered them from the inside with a couple layers of black tulle netting. This covered the human face inside while he could still see out.
Bat Bow Tie:
I used two layers of black fabric cut out in the shape of the wings, then I sewed them together like a pillow & turned them right side out, leaving the center middle bottom seam open. Since a coat hanger is not long enough, we got some stiff enough electrical wire at a hardware store. Laying the wire out on top of the fabric shape, I formed it into the same wing shape edge with the two ends coming to the middle bottom, so they could be stuffed into the opposite side opening so no wire edges were left poking out. With a little care, you can then insert the wire form into the wings, then they will keep their shape. The bat head for the center "knot" is also just cut out double from the fabric & sewn like a pillow, but actually stuffed like a pillow, then attached to the center between the wings. Then I attached ties to the middle on the back so the batwing bow tie could be tied around the neck.
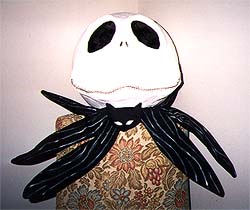
All the white lines on the whole costume are done with white fabric paint just freehand, since if you look closely at Jack, you will see that all the "pinstripes" are really curvy and not regular or even at all. Make sure it is fabric paint, not just normal acrylic paint, since fabric paint is designed to move with the fabric.
Shirt:
We used just a plain white collared shirt. It doesn't really matter what type of collar, since the collar itself is covered by the bow tie. You could even probably get away with using a turtleneck with the neck unfolded so the whole neck is actually white.
Jacket & Pants:
We went thriftstore shopping to find a black tuxedo jacket and black pants. You want the straight lapels, not notched lapels, since Jack's lapels are not notched, and that would just cause you more work to alter the lapels. Since we could not find a jacket with tails, we decided to forgo the tails altogether, thinking not many would notice their absence. If you are more the stickler, you could sew on fabric tails if you couldn't find a tail coat. You could also be very ambitious and make the whole jacket if you like. Besides the white painted curvy stripes, the only alteration to the jacket was adding another stiff wire around the edge of the lapels and collar to make the jacket stand out like Jack's puffed-out chest. We formed the wire into the desired shape, then cut the seam at the edge of the back middle of the collar, then inserted the wire along the edge of the lapel inside the fabric.

Hands:
We found skeleton gloves at a costume store and decided those were good enough. You could also use the fabric paint to make your own bones on some plain black gloves.
Shoes:
Any plain black shoes with black socks.